Hide Information in a Scanned PDF and Save It
Diperbarui 9 Sep 2026
Find the information to hide on each page of a scanned PDF and save the edited document. Even when text cannot be selected directly, you can review detections and draw masking areas yourself.
Before you start
Phone/account-number pattern detection and OCR are available including on Free; automatic name/address detection is available on Starter and above. Detections depend on the document, so inspect every page. Free exports include a watermark.
Download the original practice file: scanned-receipt.pdf. All names and contact details are fictional. Use this same source throughout the steps.
1. Upload the scan and check its pages
Upload scanned-receipt.pdf from the dashboard and open its PDF project. Both pages of this sample are stored as images; the original has no selectable or searchable text layer.
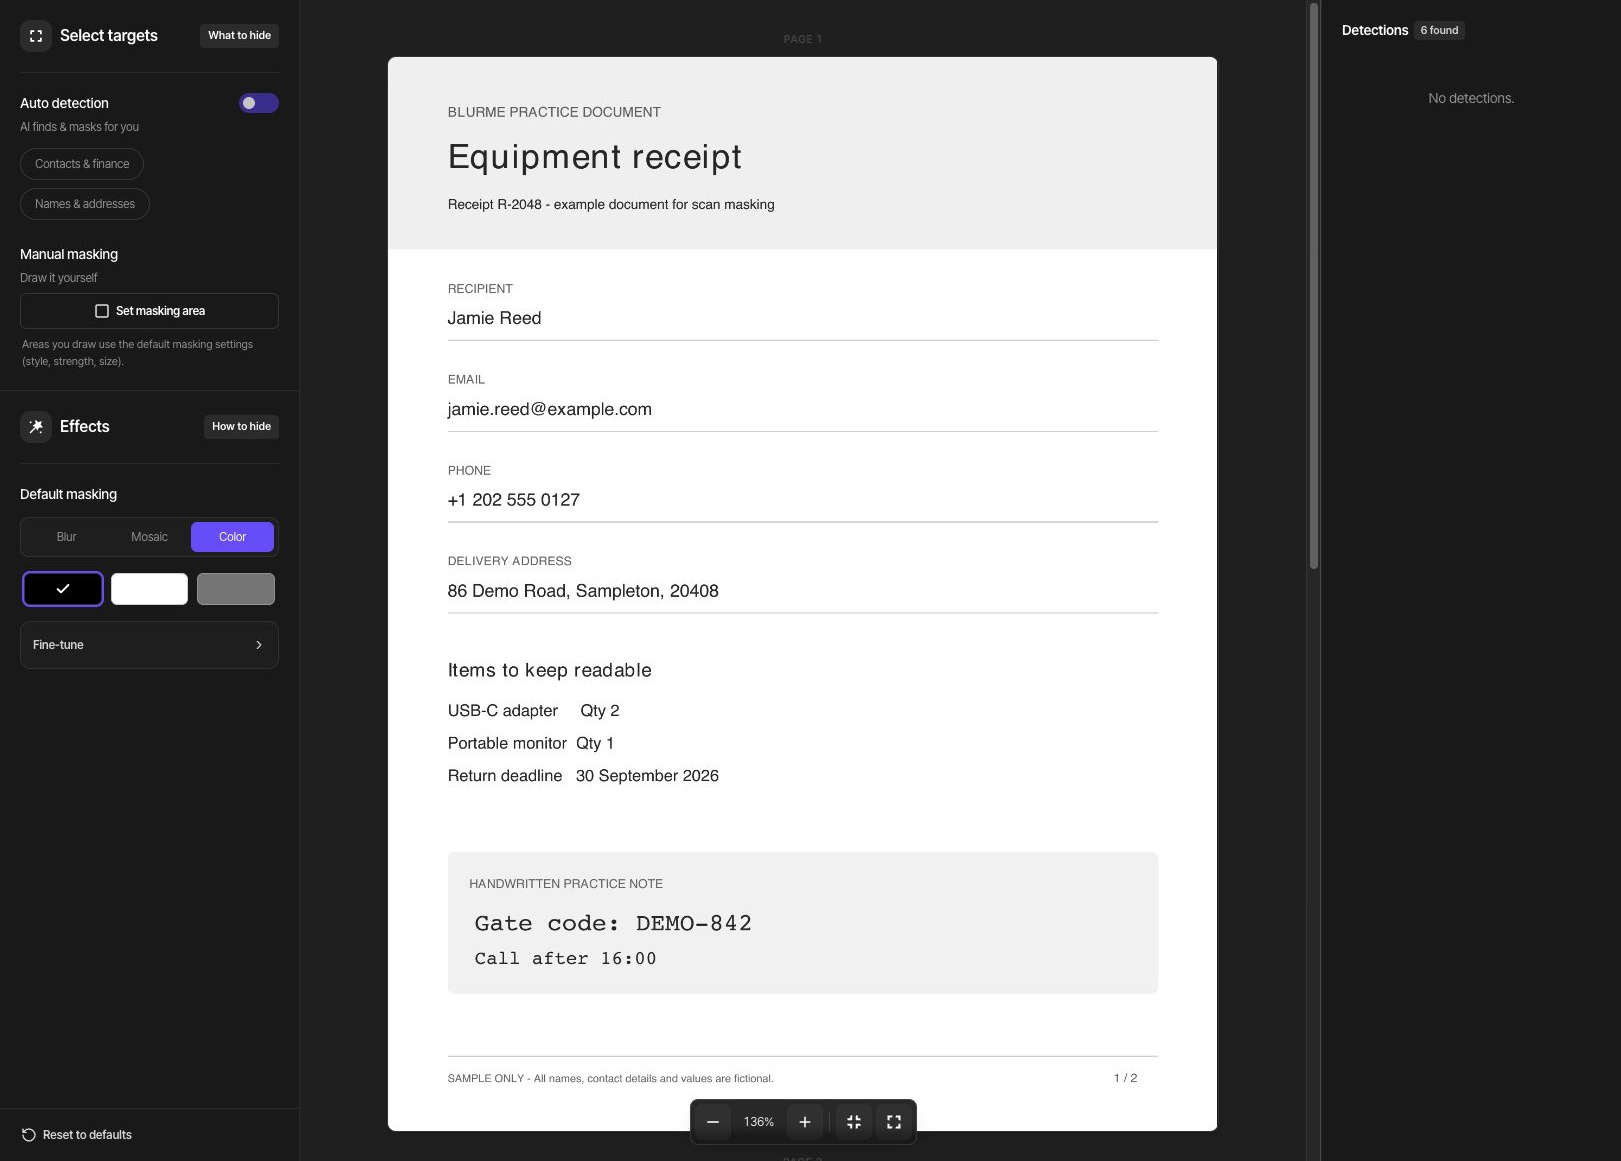
After analysis, inspect each page separately. Hide Jamie Reed, the email address, phone number, address, entry code, and confirmation signature. Keep the equipment items, return deadline, and checklist readable. To compare with the original, temporarily turn off Auto detection, inspect the content, then turn it back on.
2. Compare detections with the original image
Check Contacts & finance and Names & addresses under Auto detection, then click detected items to inspect their locations. The example shows 6 detections: 2 email addresses, 3 names (Jamie Reed twice and Reed once), and 1 address. Keep these included and select Default masking → Color → Black. Neither page’s phone number was detected, so cover both manually.
If there are no detections or some details are missing, zoom in and cover them manually. Compare small text, faint scans, and skewed areas especially carefully. A detection count does not establish that the entire document is covered.
3. Cover the name, missing details, and note on page 1
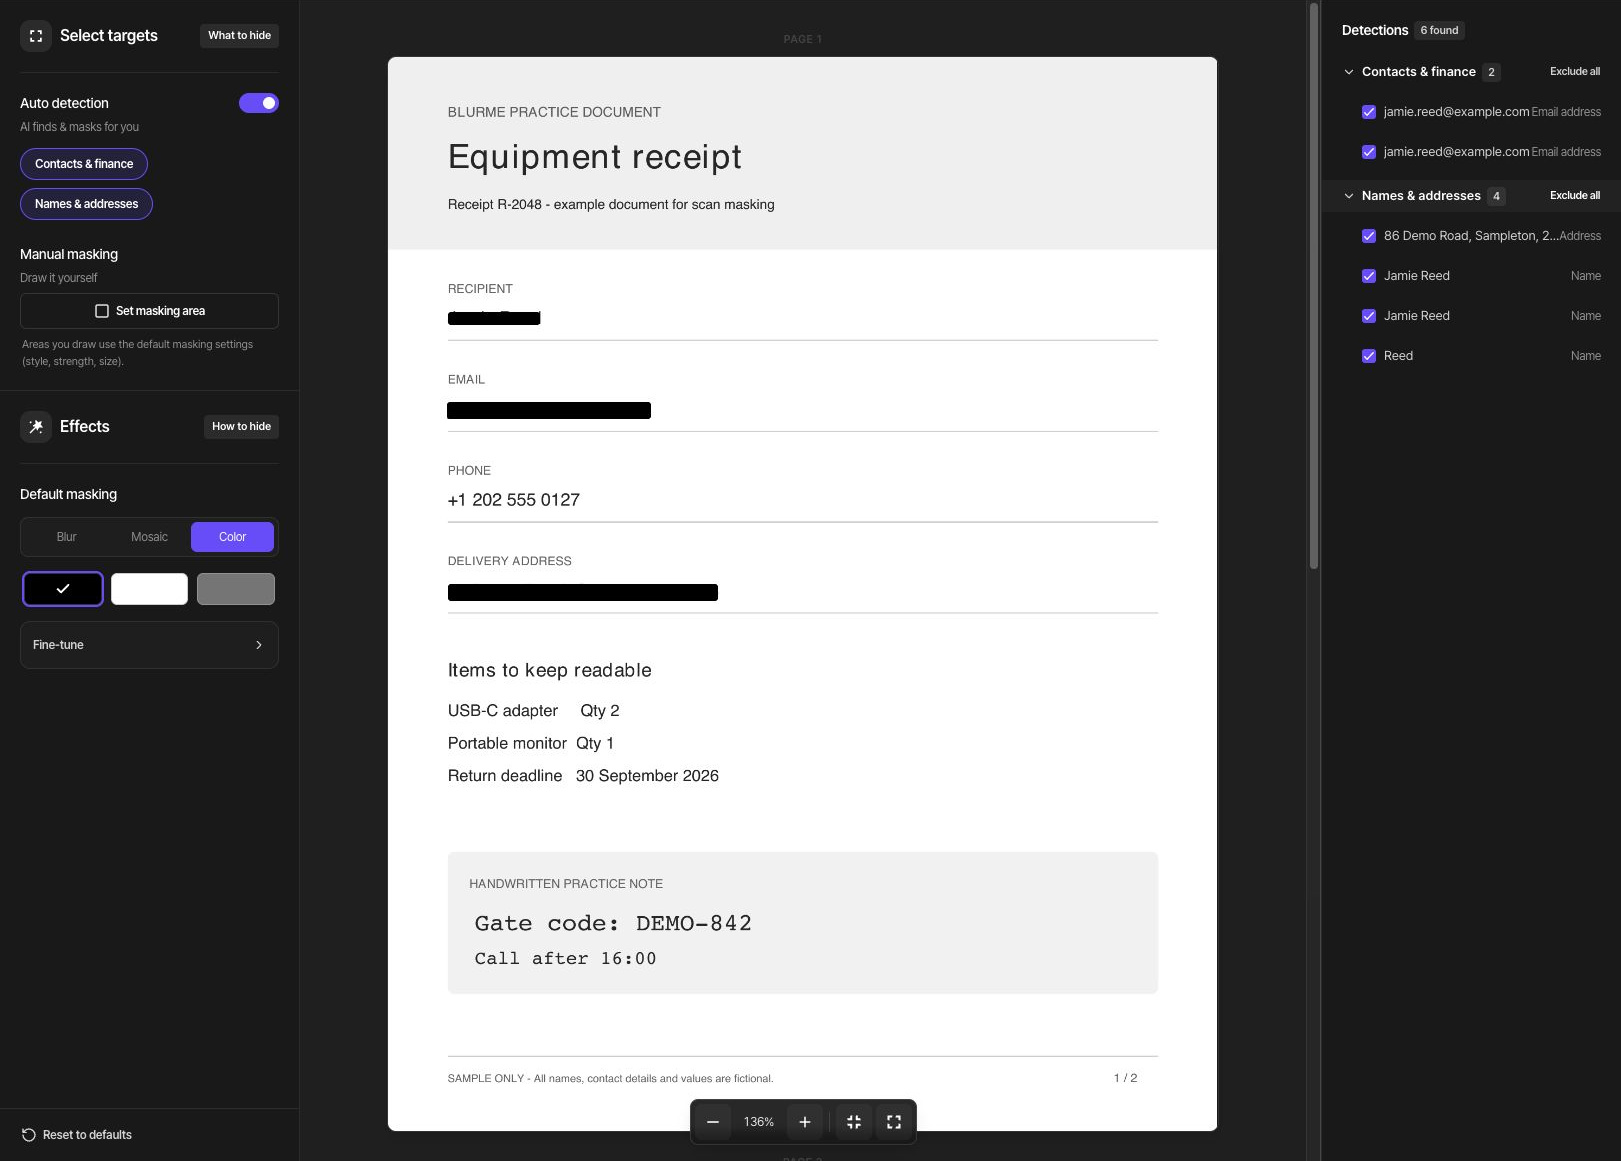
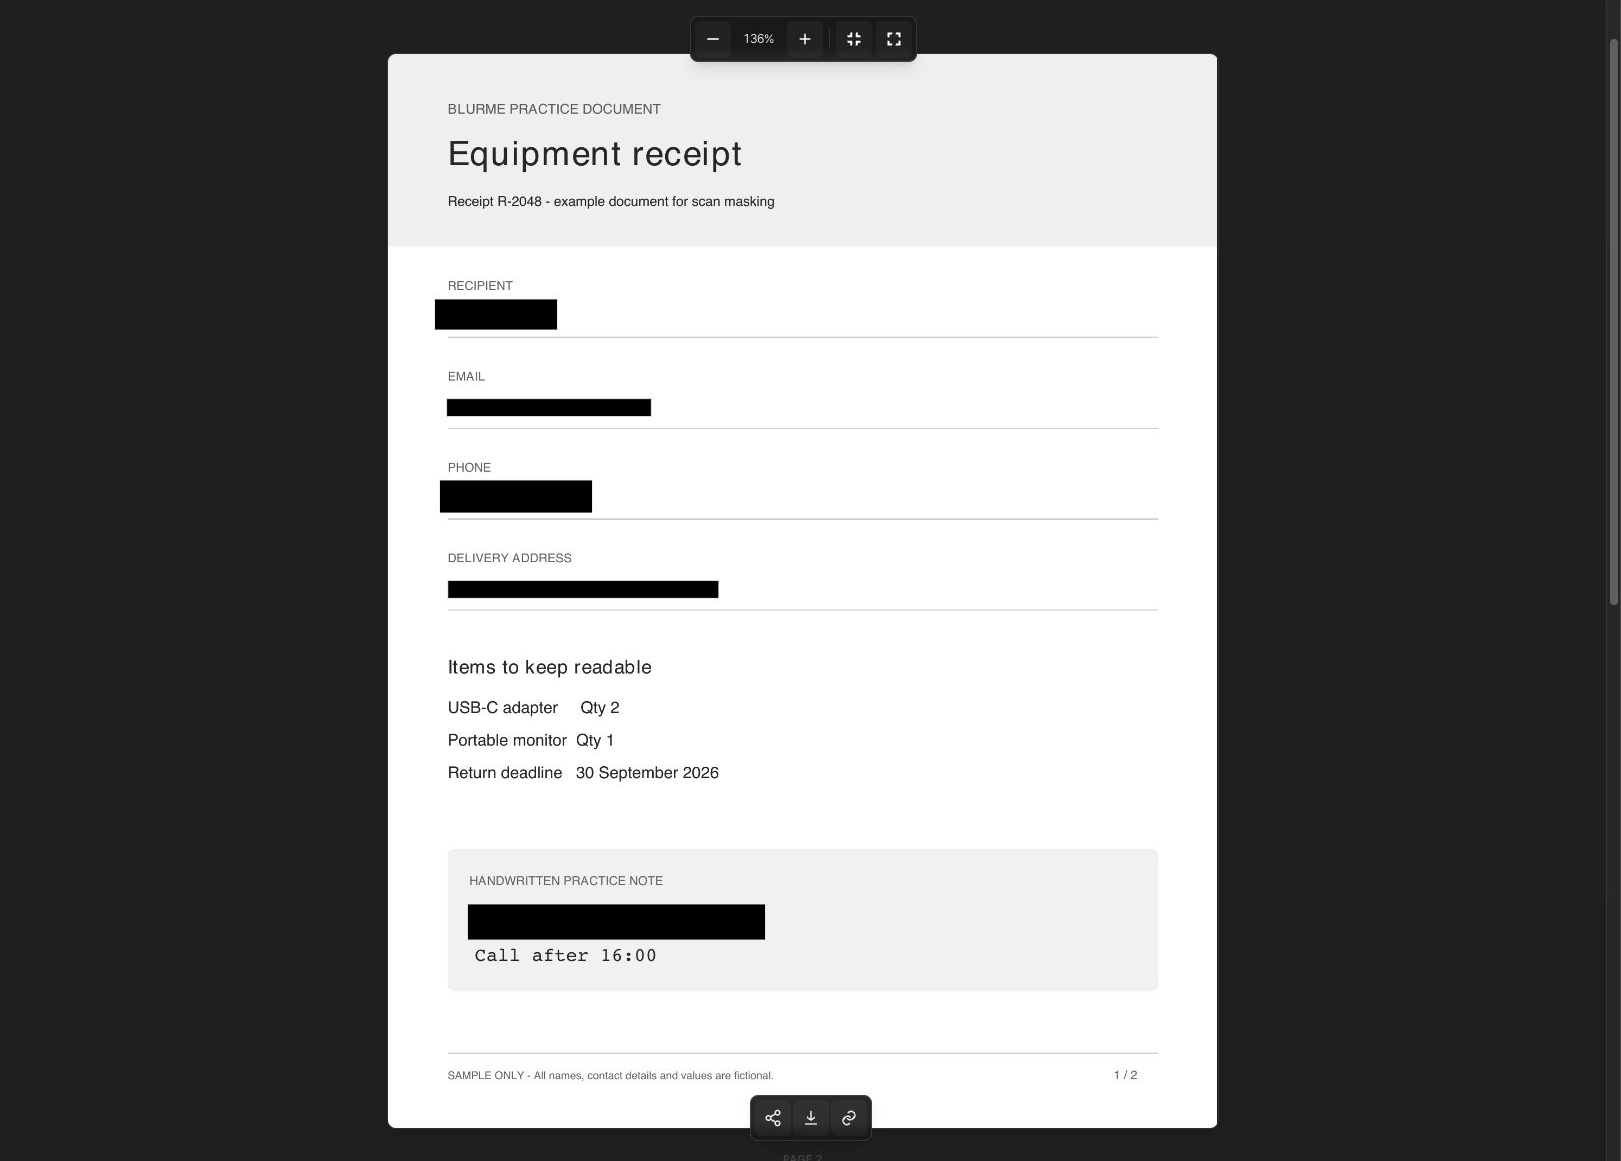
Click Set masking area and draw a separate area around the entire name, Jamie Reed, on page 1. Even though the name was detected, leave space above, below, and beside its letters to include their edges. Draw another area around the missed phone number, +1 202 555 0127, from the country code through the last digit. Also check that no letters remain exposed in the automatically masked email address and address.
Draw a separate area around the entire Gate code: DEMO-842 line, then click Done. Keep the item list, return deadline, and the intended Call after 16:00 line readable. Select a manual area to adjust its position or size.
4. Cover repeated details and the confirmation on page 2
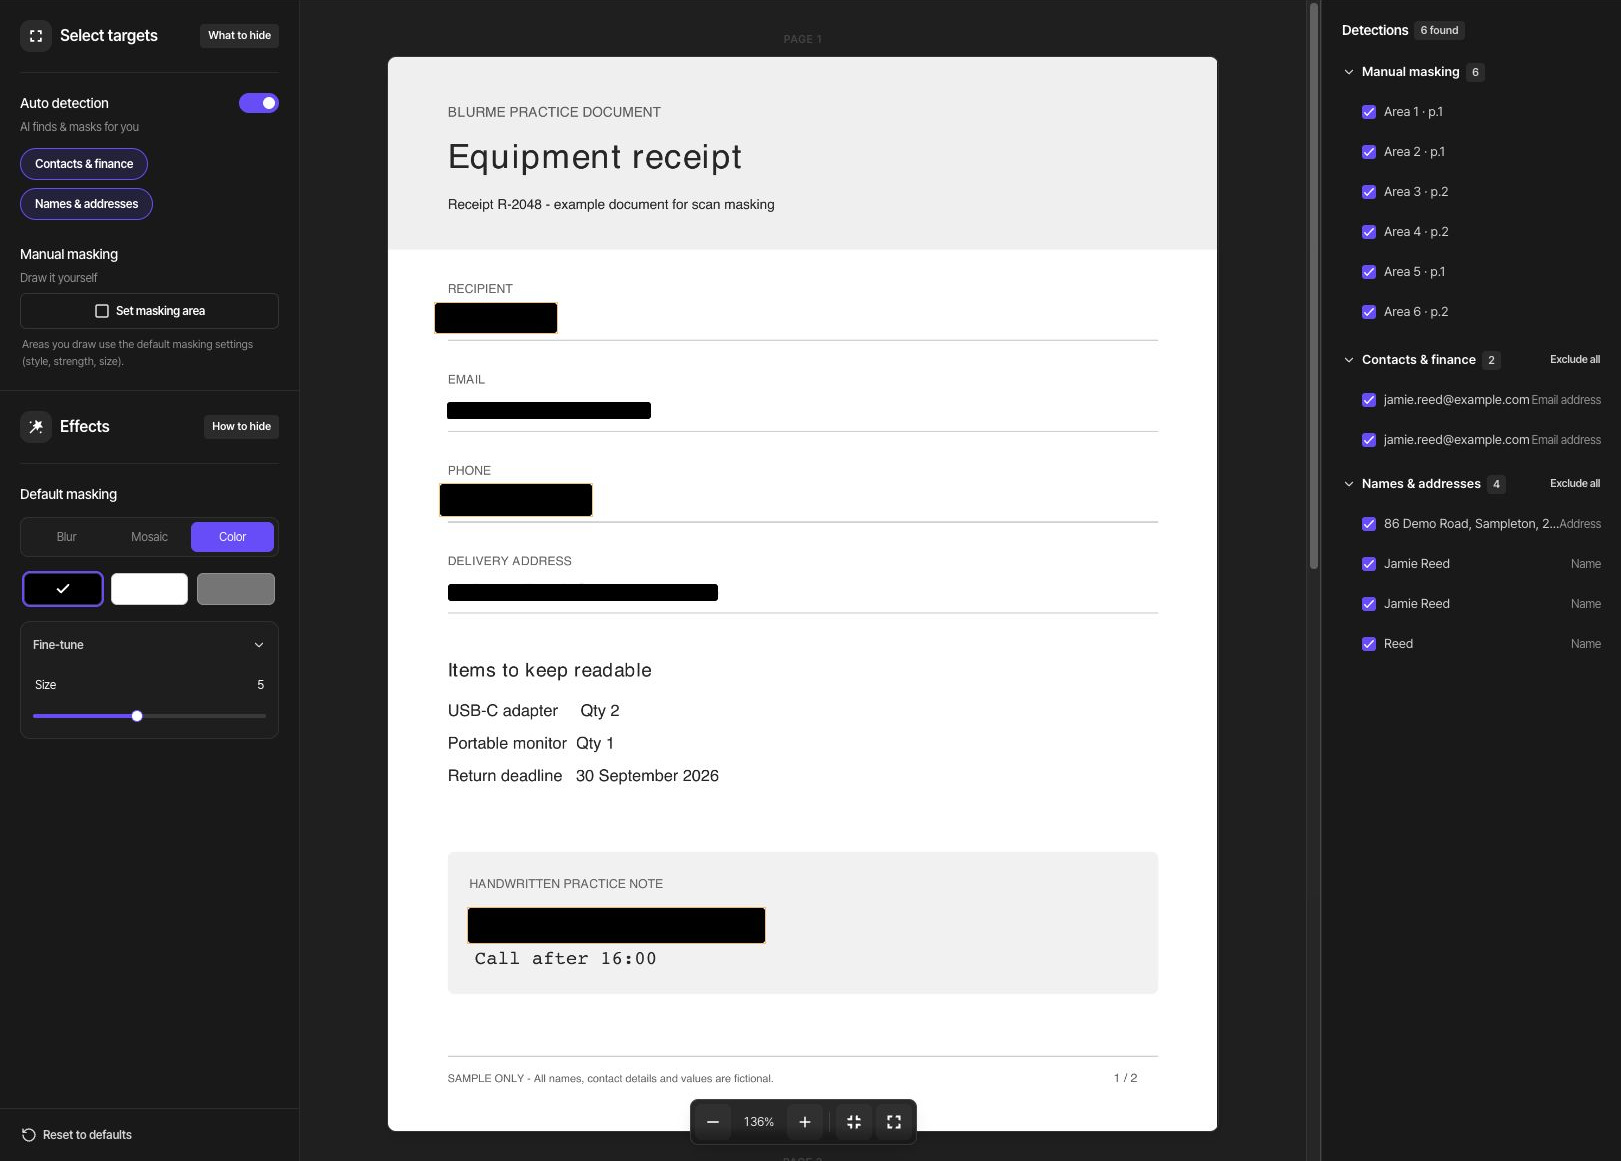
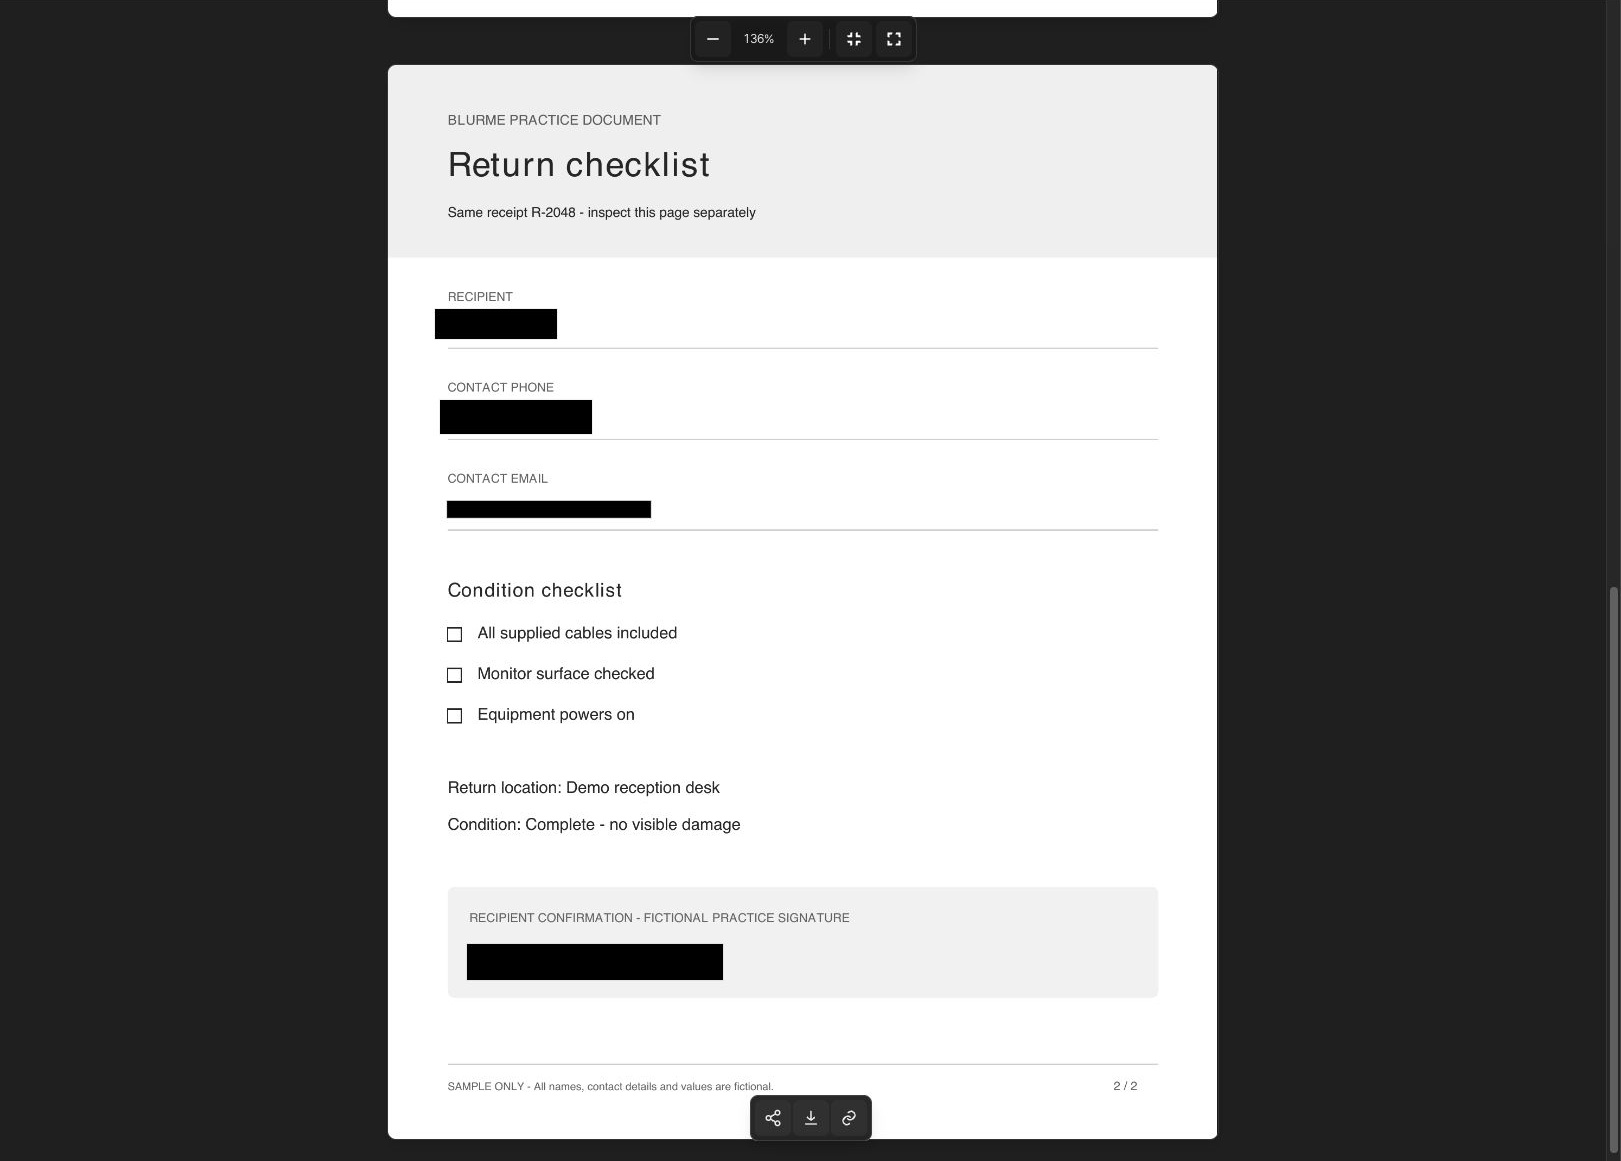
On page 2, add a manual area around the entire Jamie Reed name with space around its letters, then cover the entire missed phone number in a separate area. Only Reed is detected in the fictional confirmation signature, so draw another area around the full J. Reed / SAMPLE signature. The page-1 name, phone number, and entry code plus the page-2 name, phone number, and full signature make 6 manual masking areas.
Leave the checklist, return location, and condition description readable. Zoom in on page edges and small text, then review the entire page. Information that was not detected may not appear in the detection list at all.
Export and check the downloaded file
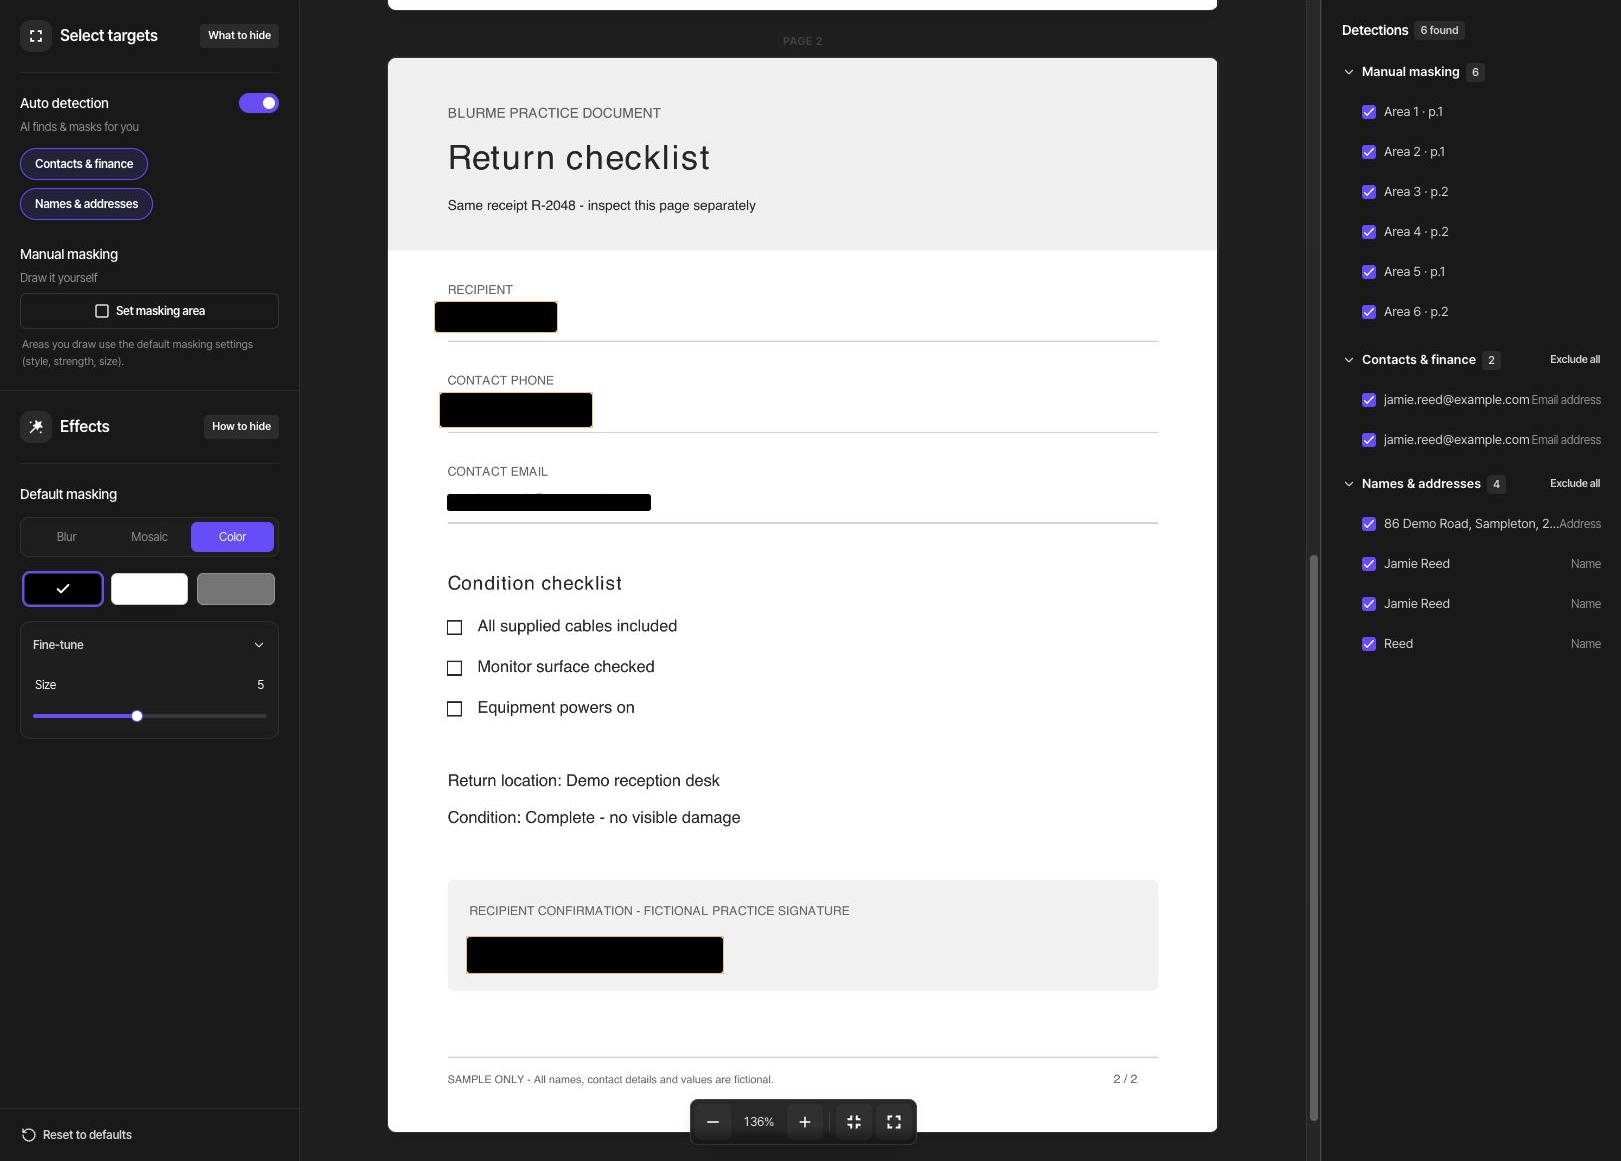
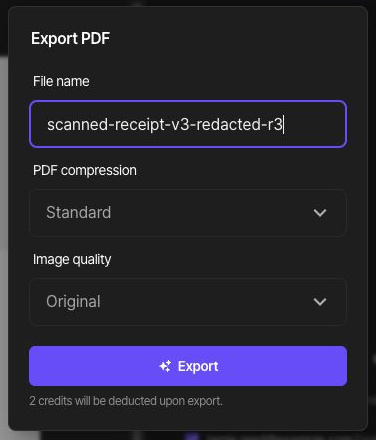
After reviewing every page, click Export. Enter scanned-receipt-v3-redacted-r3 as the file name. Choose Standard for PDF compression and Original for Image quality. The two-page example displays a cost notice of 2 credits. Review the displayed estimate before starting the export.
On the PDF result page, inspect each page and click the Download icon at the bottom. Reopen the downloaded PDF in a PDF viewer on your device and confirm that both pages are present. The names, contact details, entry code, and full signature should be hidden, while the equipment items, return deadline, checklist, and retained note remain readable.
PDF compression offers None, Standard, and Maximum; image quality offers Original, High, Standard, and Low. If you need a smaller file, export with different settings and compare the actual file sizes and the readability of small text and photos.
To correct the result, choose Edit, adjust the masking, and export again. A file already downloaded does not update when you edit its project.
Check search and copy separately
Use Default masking → Color to hide selectable text. Color is used for content removal in the selected area; Blur and Mosaic are visual effects. Check the downloaded PDF as described below instead of judging only by its appearance.
Strings to check in this sample: Jamie Reed, jamie.reed@example.com, +1 202 555 0127, 86 Demo Road, DEMO-842, J. Reed.
Search the entire downloaded PDF for the names, contact details, and other values you hid. Select text across the covered area, copy it, and paste it elsewhere to check for hidden content. If your viewer supports text export, extract the whole document and check the same strings there.
This sample starts as a scanned PDF with no text layer. Some PDF viewers recognize text in page images for search and copy. An empty search result alone cannot prove that masking succeeded, so also zoom in and inspect the actual image on every page.
If hidden content remains visible or appears in search, copied text, or extracted text, do not share that output. Correct the area and masking method and export again. If the corrected output still has the problem, use the troubleshooting guide.